Simple 12V to 230VAC Inverter Circuit – MOSFET
In this post we are going to construct a simplest 12VDC to 230VAC inverter using transistor and MOSFETs.
We will learn:
- Different Stages in an Inverter Circuit.
- Circuit Diagram of the Inverter.
- Analysis of this Inverter’s Waveform.
- Understanding Astable Multivibrator.
- Maximum Power Output of an Inverter.
- Advantages and Disadvantages of this Inverter.
Power Inverters need no introduction; we use them when there is a power cut or in an emergency situation or simply you are on a camp.
Power inverters can deliver power anywhere between 10 watts to 10000 watts depending on your needs and inverters can also be single phase or three phase depending on your application.
Power inverters can deliver power anywhere between 10 watts to 10000 watts depending on your needs and inverters can also be single phase or three phase depending on your application.
Inverters can be with any specifications, but a standard inverter has these important stages:
Stages of an Inverter:
- Power source i.e. battery
- Oscillator
- Driving Stage
- Transformer
Let’s explore one by one:
Battery / DC Power source:
The DC power source can be a deep cycle battery or a DC generator or a solar panel. They all gives stable DC power to the inverter.
The DC power source can be a deep cycle battery or a DC generator or a solar panel. They all gives stable DC power to the inverter.
The voltage to an inverter can be 6V or 12V or 24V or 48V or even 84V, it depends on the inverter’s input specification.
Oscillator:
The oscillator is the stage where the constant DC from the battery is converted to AC; we can say this stage as the heart of the Inverter because this generates frequency or pulses like human heart.
Initially the LOW voltage DC is converted LOW voltage AC by means of a multivibrator or any oscillator circuit. The oscillation produced by the oscillator may be a square wave or sine wave or modified sine wave with a fixed frequency and fixed duty cycle mostly 50/60 Hz at 50% duty cycle.
The LOW voltage AC is fed to the next stage which is the driving stage consists of MOSFETs or Transistors.
Driving Stage:
The oscillating stage just gives oscillating AC weak signal which cannot be fed to a transformer to boost the voltage.
The driving stage increases the strength of the oscillating AC signal.
The driving stage consists of MOSFETs or Transistors. Most commercial Inverters are packed with MOSFETs for driving stage because it is very efficient in switching, less resistance path between source and drain terminal which translates to less heat.
Driving a MOSFET is easy as it can be directly controlled by a microcontroller or ICs
Power transistor needs intermediate driving stage to bias the power transistor to optimum level, which takes more space on PCB and increase components cost as well.
In this project we are using MOSFETs.
Transformer:
The transformer is the component which converts Low voltage AC to high voltage AC.
The amplified AC signal from the driving stage is strong and ready to feed the transformer. The transformer can be with centre tap or without centre tap.
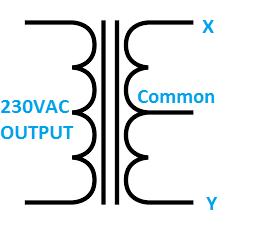
Let’s explore the example of center taped transformer.

The center tap terminal is generally connected to +Ve of the battery, because the MOSFETs used for inverters are N-Channel (N-channel MOSFETs are more efficient).
The MOSFETs are placed at X and Y terminal and one of the two MOSFETs are turned ON at an instant and in alternating manner.
Say MOSFET at ‘X’ is turned on, now the current flows from centre tap to ‘X’, energizing that particular winding. Due to mutual induction the other side of the coil with higher number of turns get energized and the output shoots volt high due to higher number of turns.
After 10ms (For 50Hz), the MOSFET at ‘Y’ gets turn ON and at ‘X’ turns OFF, the current flows from centre tap to ‘Y’ and energizing that particular winding.
Now the coil with higher number of turns gets energized with opposite polarity and shoots the output voltage high.
This cycle continues and gives out 230VAC / 50Hz which can be utilized by our everyday gadgets.
Now you know how a basic inverter works.
Circuit Diagram of Inverter:

Download a better high resolution circuit diagram here
Component List:
- BC548 / Any NPN Transistor x 2
- 27K ohm x 2
- 1K ohm x 2
- 47 uF x 2 – Electrolytic or ceramic
- MOSFET IRF540N or any N-channel MOSFET x2
- Transformer 9V-0-9V / 10A (At-least 5A)
- Fuse 5A (For short circuit protection of battery)
- 12V 7Ah Battery
Circuit Description:
The circuit is very easy, even a beginner can accomplish with ease.
The circuit consists of Astable multivibrator which uses two transistors and tuned to generate 50 Hz to 60 Hz at 50% duty cycle. The frequency can be from 50 to 60 Hz; this is due to the tolerance of the capacitors and resistors which creates inaccuracy.
This Astable multivibrator acts as oscillator for this inverter. The driving stage has 2 MOSFETs IRF540N and the 230V / 9V-0-9V / 10A transformer boosts the output voltage.
Analyzing the waveform:

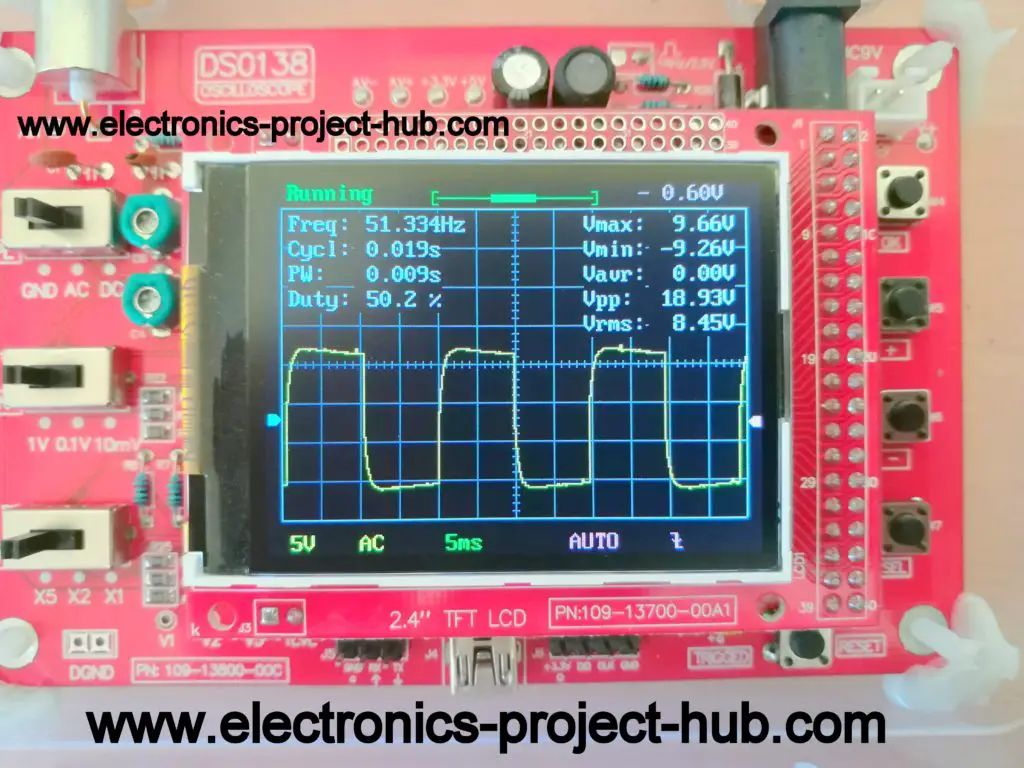
The oscilloscope is probed at gate terminal of the both MOSFETs and we get the above waveform which is square wave at around 50Hz and 50% duty cycle.
Understanding Astable Multivibrator:
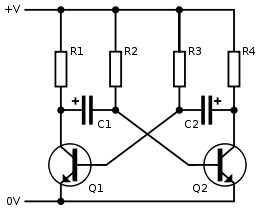
If you take a close look at the circuit diagram you can find a circuit similar to below one:

This is called Astable multivibrator. Astable means the output is not stable, but the output switches ON and OFF with a fixed frequency and duty cycle.
The output frequency is determined by capacitors C1, C2 and R2, R3 from the above circuit diagram.
To get 50% duty cycle C1 and C2 should have same value and R2 and R3 should also have same value at the same time the two transistors should have similar gain.
The Frequency of transistor based Astable multivibrator is given by:
F = 1 / 1.38 x R x C
- F is frequency in Hertz.
- R is resistance in ohm.
- C is capacitance in Farad.
Let’s try calculating the frequency of this inverter:
F = 1 / 1.38 x 27 x 103 x 0.47 x 10-6
F = 57.10 Hz
NOTE: Due to the tolerance of the components we will get around 50Hz to 60Hz stable. Most gadgets will work happily on this frequency.
How much power output do I get?
For this Inverter you may get around 75 watts or less output from 9V/10A transformer which is driven by IRF540N MOSFET with 12V 7Ah battery.
The output power of any Inverter depends on these three things:
- DC Source
- Current Delivering Capacity of MOSFETs/Driving Stage
- Transformer
DC Source:
The power output of your Inverter depends on the battery’s or solar panel’s maximum power rating.
A battery has certain limit to deliver current if you force above its limit there will be degradation of battery life. You should not expect a 12V 7Ah battery to deliver 500 Watts of power.
If you want to power some higher wattage appliances you should upgrade your battery / solar panel.
MOSFET / Driving Stage:
The driving stage has limitation to conduct current from battery to the transformer. The IRF540N can deliver 33A as per its data sheet. So 12V (battery) x 33A = 396 Watts maximum if your battery and transformer can handle.
If you want even more power output you can chose more powerful MOSFET or connect two or more IRF540N in parallel.
Transformer:
The transformer is the most expensive part in an inverter circuit.
The transformer’s limit can be calculated by multiplying voltage and current of secondary side of the step-down transformer (we are using in reverse, so the inverter sees as step-up transformer).
For example: With 9V/10A transformer 9V x 10A = 90 Watts Maximum. You will get around 75 watts after losses.
Now you know the limiting factors with your inverter.
Advantages of this Inverter:
- Simple design can be built by beginners.
- Decent efficiency around 75 to 80%.
- Stable frequency around 50 to 60 Hz.
- Well tested circuit.
Disadvantage of this Inverter:
- Output voltage varies as the load increases.
- Square wave is not suitable for sensitive electronic gadgets such as medical equipments.
If you have any further questions regarding this project, please comment below, you will get a guaranteed reply.
Comments
Post a Comment