
Digital Clock Circuit Using IC 555 and IC 4026In this post we are going to build a 12 hour – 7 segment display digital clock without any microcontroller. We will be using only basic CMOS ICs and pure logic to build the circuit, yet this circuit can be easily replicated by beginners in electronics.
We will see:
- Main Circuit Diagram.
- Pulse Generator for Digital Clock.
- IC 4026 Pin Configuration.
- IC 4017 Pin Configuration.
- IC 7408 AND Gate Pin Configuration.
- How to Set Time.
- How to Wire the Circuit Easily.
Circuit Diagram for 7 Segment Display Digital Clock:
Download high resolution image of the above circuit diagram: click here
Circuit Description:The above circuit consists of 4 seven segment display driver IC 4026 which can display 0 to 9 on common cathode 7 segment display, one IC controls one 7 segment display. There are three IC 4017 which are decade counters, it tracks the time and reset the IC 4026’s count to “00” when the minute digit reaches 60.
There is a logic two input AND gate IC 7408 in this circuit which is used for resetting the hour digits to “00” when hour reaches “12”. The AND gate’s output goes HIGH when its two inputs are HIGH. The input for AND gate is provided by two IC 4017s (IC6 and IC7), when the clock reads 12 the pin numbers 2 and 4 of IC6 and IC7 respectively becomes HIGH and rest the IC1 and IC2 (4026s) to count “00”.
NOTE: This clock circuit will show 12:00 as 00:00 at midnight and also at noon.
The circuit needs clock signal to increment the counts, this is provided by the below circuit which outputs 1 pulse every minute.
Pulse Generator for clock circuit: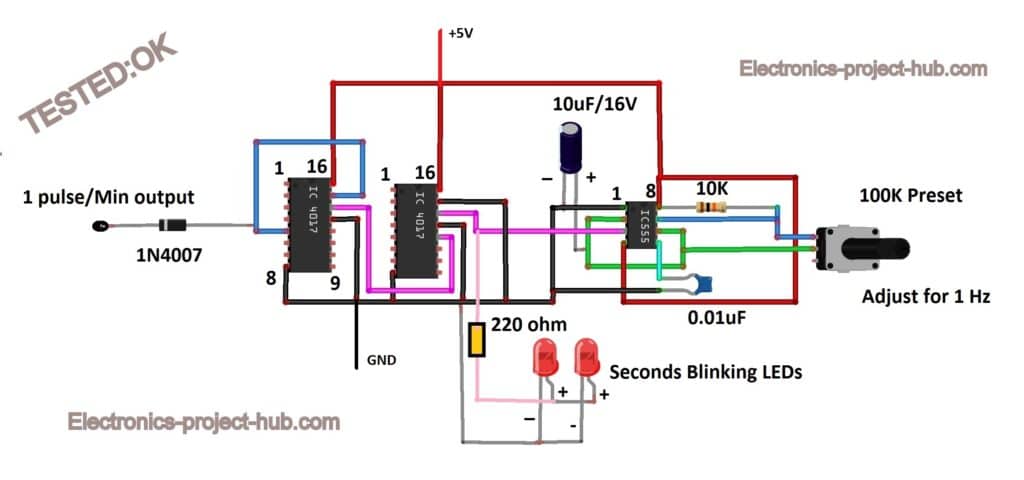

This circuit will output a short burst of pulse for every one minute which will increment the count in the main circuit. This circuit consists of two IC 4017s one of them will divide the input 1 Hz signal by 10 and another IC 4017 will divide the 10 by 6 so at the end we will get 1 pulse every minute (60 pulses).
The IC 555 is configured as Astable multivibrator whose pulse can be controlled using given 100K pre-set resistor. You have to adjust the pre-set and bring the pulse of IC 555 to 1 Hz. There are two blinking LEDs which can be inserted in between the hour and minute digits. All the circuit is power at 5V.
NOTE: The accuracy of this digital clock depends on how accurate you bring the IC 555 pulse to 1 Hz.
IC 4026 to 7 segment display connection:
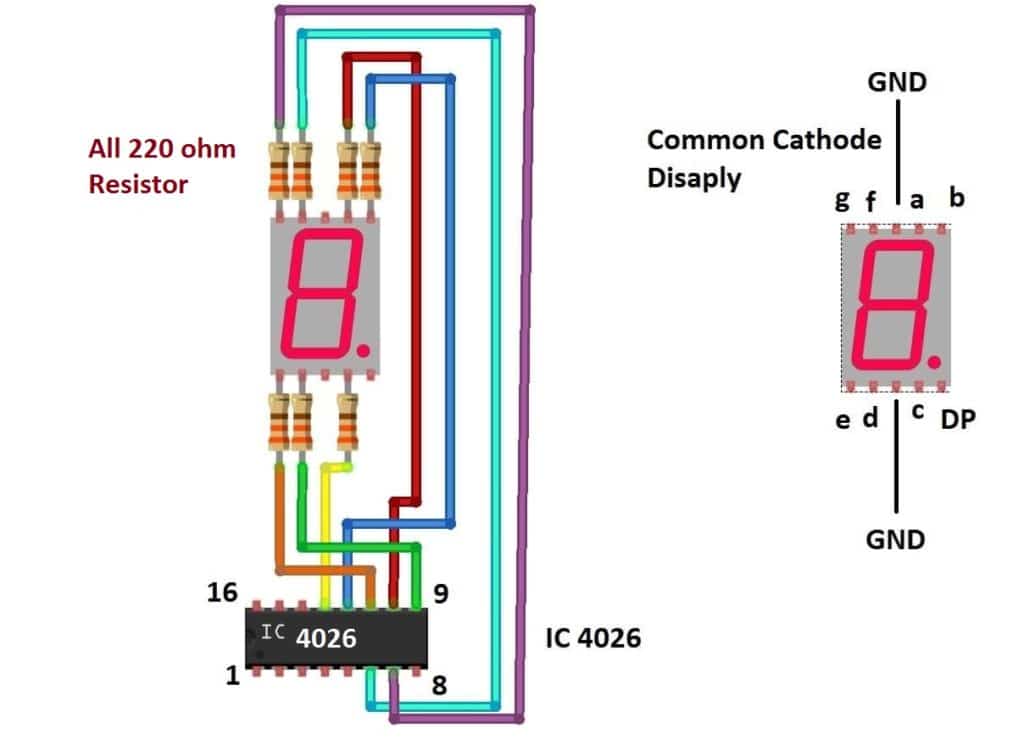
You need to connect the 220 ohm resistor to each segment as shown above. Now let’s see the pin diagram of IC 4026.
IC 4026 Pin Diagram:
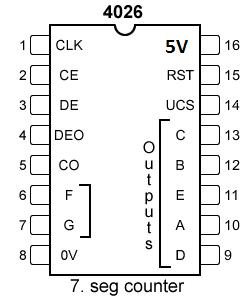
- Pin #1 is clock input, when we apply clock signal, the IC increments the count.
- Pin #2 is Clock Enable, when it is connected to Vcc the clocks inputs are ignored, it has to be grounded during normal operation so that counts can be incremented.
- Pin #3 is Display Enable, when it is connected to Vcc the 7 segment display lights up, grounding this pin will turn off the display but the count will be incremented internally, this can be used for power saving.
- Pin #4 is not used here.
- Pin #5 is carry out, when the count reaches 10 this pins outputs HIGH signal, this output is used for cascading another IC 4026 for 10’s place digit.
- Pin numbers 6, 7, 9, 10, 11, 12, 13 are output for 7 segment display.
- Pin # 8 is ground and pin # 16 is +5V supply.
- Pin #15 is reset, when this pin is connected HIGH the count resets to zero. This pins has to be grounded while incrementing the count.
Pin Diagram of IC 4017: 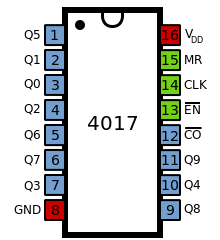

The IC 4017 is a decade counter meaning it can count up to 10. There are 10 output pins each gets high sequentially with successive input pulses. For example, when the IC is powered ON the pin #3 (Q0) gets high initially; rest of the output pins goes to LOW state, when a pulse is applied the pin #3 goes LOW and pin #2 (Q1) gets HIGH and rest of the output pins stays LOW, similarly for Q2 to Q9.
- Pin numbers 1, 2, 3, 4, 5, 6, 7, 9, 10, 11 are output pins.
- Pin #8 is GND and pin #16 is Vcc.
- Pin #15 is reset, when this pin connects to HIGH signal the count reset to zero.
- Pin #14 is clock input.
- Pin# 13 is clock enable; when this pin is connect to Vcc the pulse will be ignored, during normal operation this pin has to be grounded.
- Pin #12 is for carry out function.
Pin diagram of IC 7408:
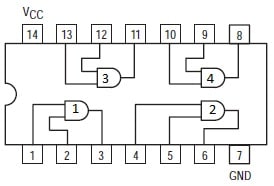
The IC 7408 is two input logic AND gate, it has 4 gates; we are using just one of them.
- Pin #14 is +5V and pin #7 is GND.
- Pin #1 and 2 are input and pin #3 is output, similarly for rest of the gates.
The output gets HIGH only when its two inputs are HIGH; if any one or both the inputs are LOW the output goes LOW.
How to Set Time:
You can set time using the given two push buttons, one for hours and one for minutes. You have to push and release the button for incrementing one digit, long pressing will not increment the count.
How to Wire the circuit easily:
Wiring the circuit is the tedious part of this project and connecting a single wire incorrectly can mess the project. You can wire the circuit without any mistake by finishing a bunch of wires of with same colors as shown in the schematic.
The main circuit wiring is smartly indicated with colors: Red, black, green, pink, yellow, blue and cyan (clock input). Finish any one of the colors first and move on to next, this will ensure that all the connections are done properly. once the main circuit connections are done; now connect the all 4 seven segment displays to four IC 4026s. If it didn’t work at first attempt don’t give up.
24 Hour Clock Design:
Here we are going to discuss 24 hour digital clock design using IC 555 and IC 4026.
I would like to thank the guy with the username “kuma” for sharing his 24 hour clock design. He not only successfully replicated 12hrs clock project but also able to modify it to 24 clock and added some useful features

Comments
Post a Comment